UTAS KIT207 Portfolio
Tutorial 5: Cinemachine and Post-Processing Stack
This week, I added cinemachine cameras and post-processing to the test project game. Cinemachine cameras allow for more dynamic feeling visuals, and post-processing can do a lot to make a game look more visually stunning.
In the project, there are two cinemachine cameras:
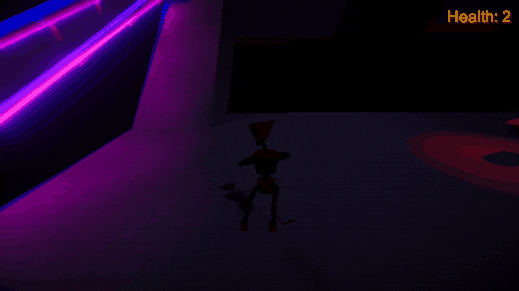
- A basic vcam with a transposer, set to follow the player at a set distance with some damping. This is the default camera, and the one shown at the beginning of the GIF.
- A vcam on a dolly, that moves along a predefined path to remain close to the player, while always looking at them. The camera transitions to this perspective at the top of the ramp in the GIF.
The project also contains a tonne of interesting post-processing effects to achieve its look. The default post-processing view has these effects:
- Colour grading, with an ACES tonemapping mode and post-exposure tone of 1. Darkens the scene and matches the lighting.
- Bloom with intensity of 10, and threshold of 1.5. Adds pleasing bloom effects around the neon lights on the ramp.
- Chromatic aberration with an intensity of 1. I just love chromatic aberation! This has the cool effect of separating the colours of objects near the borders of the screen.
- Lens distortion with intensity of 30. It's lens distortion – it's pretty obvious what it does – in this case it's adds a center bulge to the camera.
- Vignette with a black colour and intensity of 0.7. The vignette is barely noticeable, but slightly darkens the edges of the camera image.
Additionally, one might note that the post-processing changes at the top of the ramp. There is a trigger area at the top of the ramp that overrides the post-exposure on the colour grading to have a value of 4, brightening the entire scene. This brightening effect is only maintained whilst in the area at the top of the ramp.
UTAS KIT207 Portfolio
A portfolio of the work created in KIT207 Game Design and Production.
| Status | In development |
| Category | Other |
| Author | JoshGx |
More posts
- Self-Study Module 5: LightingAug 16, 2021
- Self-Study Module 4 (Pt2): Game IdeasAug 08, 2021
- Self-Study Module 4 (Pt1): A Simple GameAug 08, 2021
- Tutorial 3: Unity Enemy NavMesh AI, and RaycastingAug 08, 2021
- Self-Study Module 3: Unity Terrain and ProBuilderAug 03, 2021
- Tutorial 2: Animated Character in Unity SceneAug 03, 2021
- Tutorial 1: Unity Street SceneJul 27, 2021
- Self-Study Module 2: Blender Animated CharacterJul 26, 2021
- Self-Study Module 1: Blender Rubbish BinJul 18, 2021
Leave a comment
Log in with itch.io to leave a comment.